Table of Contents
Have you ever sent a design to print, only to find that important text or images were cut off at the edges? This frustrating mistake costs Canadian businesses thousands of dollars every year—and it’s completely avoidable. The culprit? A misunderstanding of print bleed. CMYK vs RGB for print design
In this guide, we’ll break down exactly what bleed means in printing, why it matters, and how to set up your files correctly the first time. Whether you’re a designer, small business owner, or marketing professional in the Niagara Region, understanding bleed will save you time, money, and headaches.
What Exactly is Print Bleed?
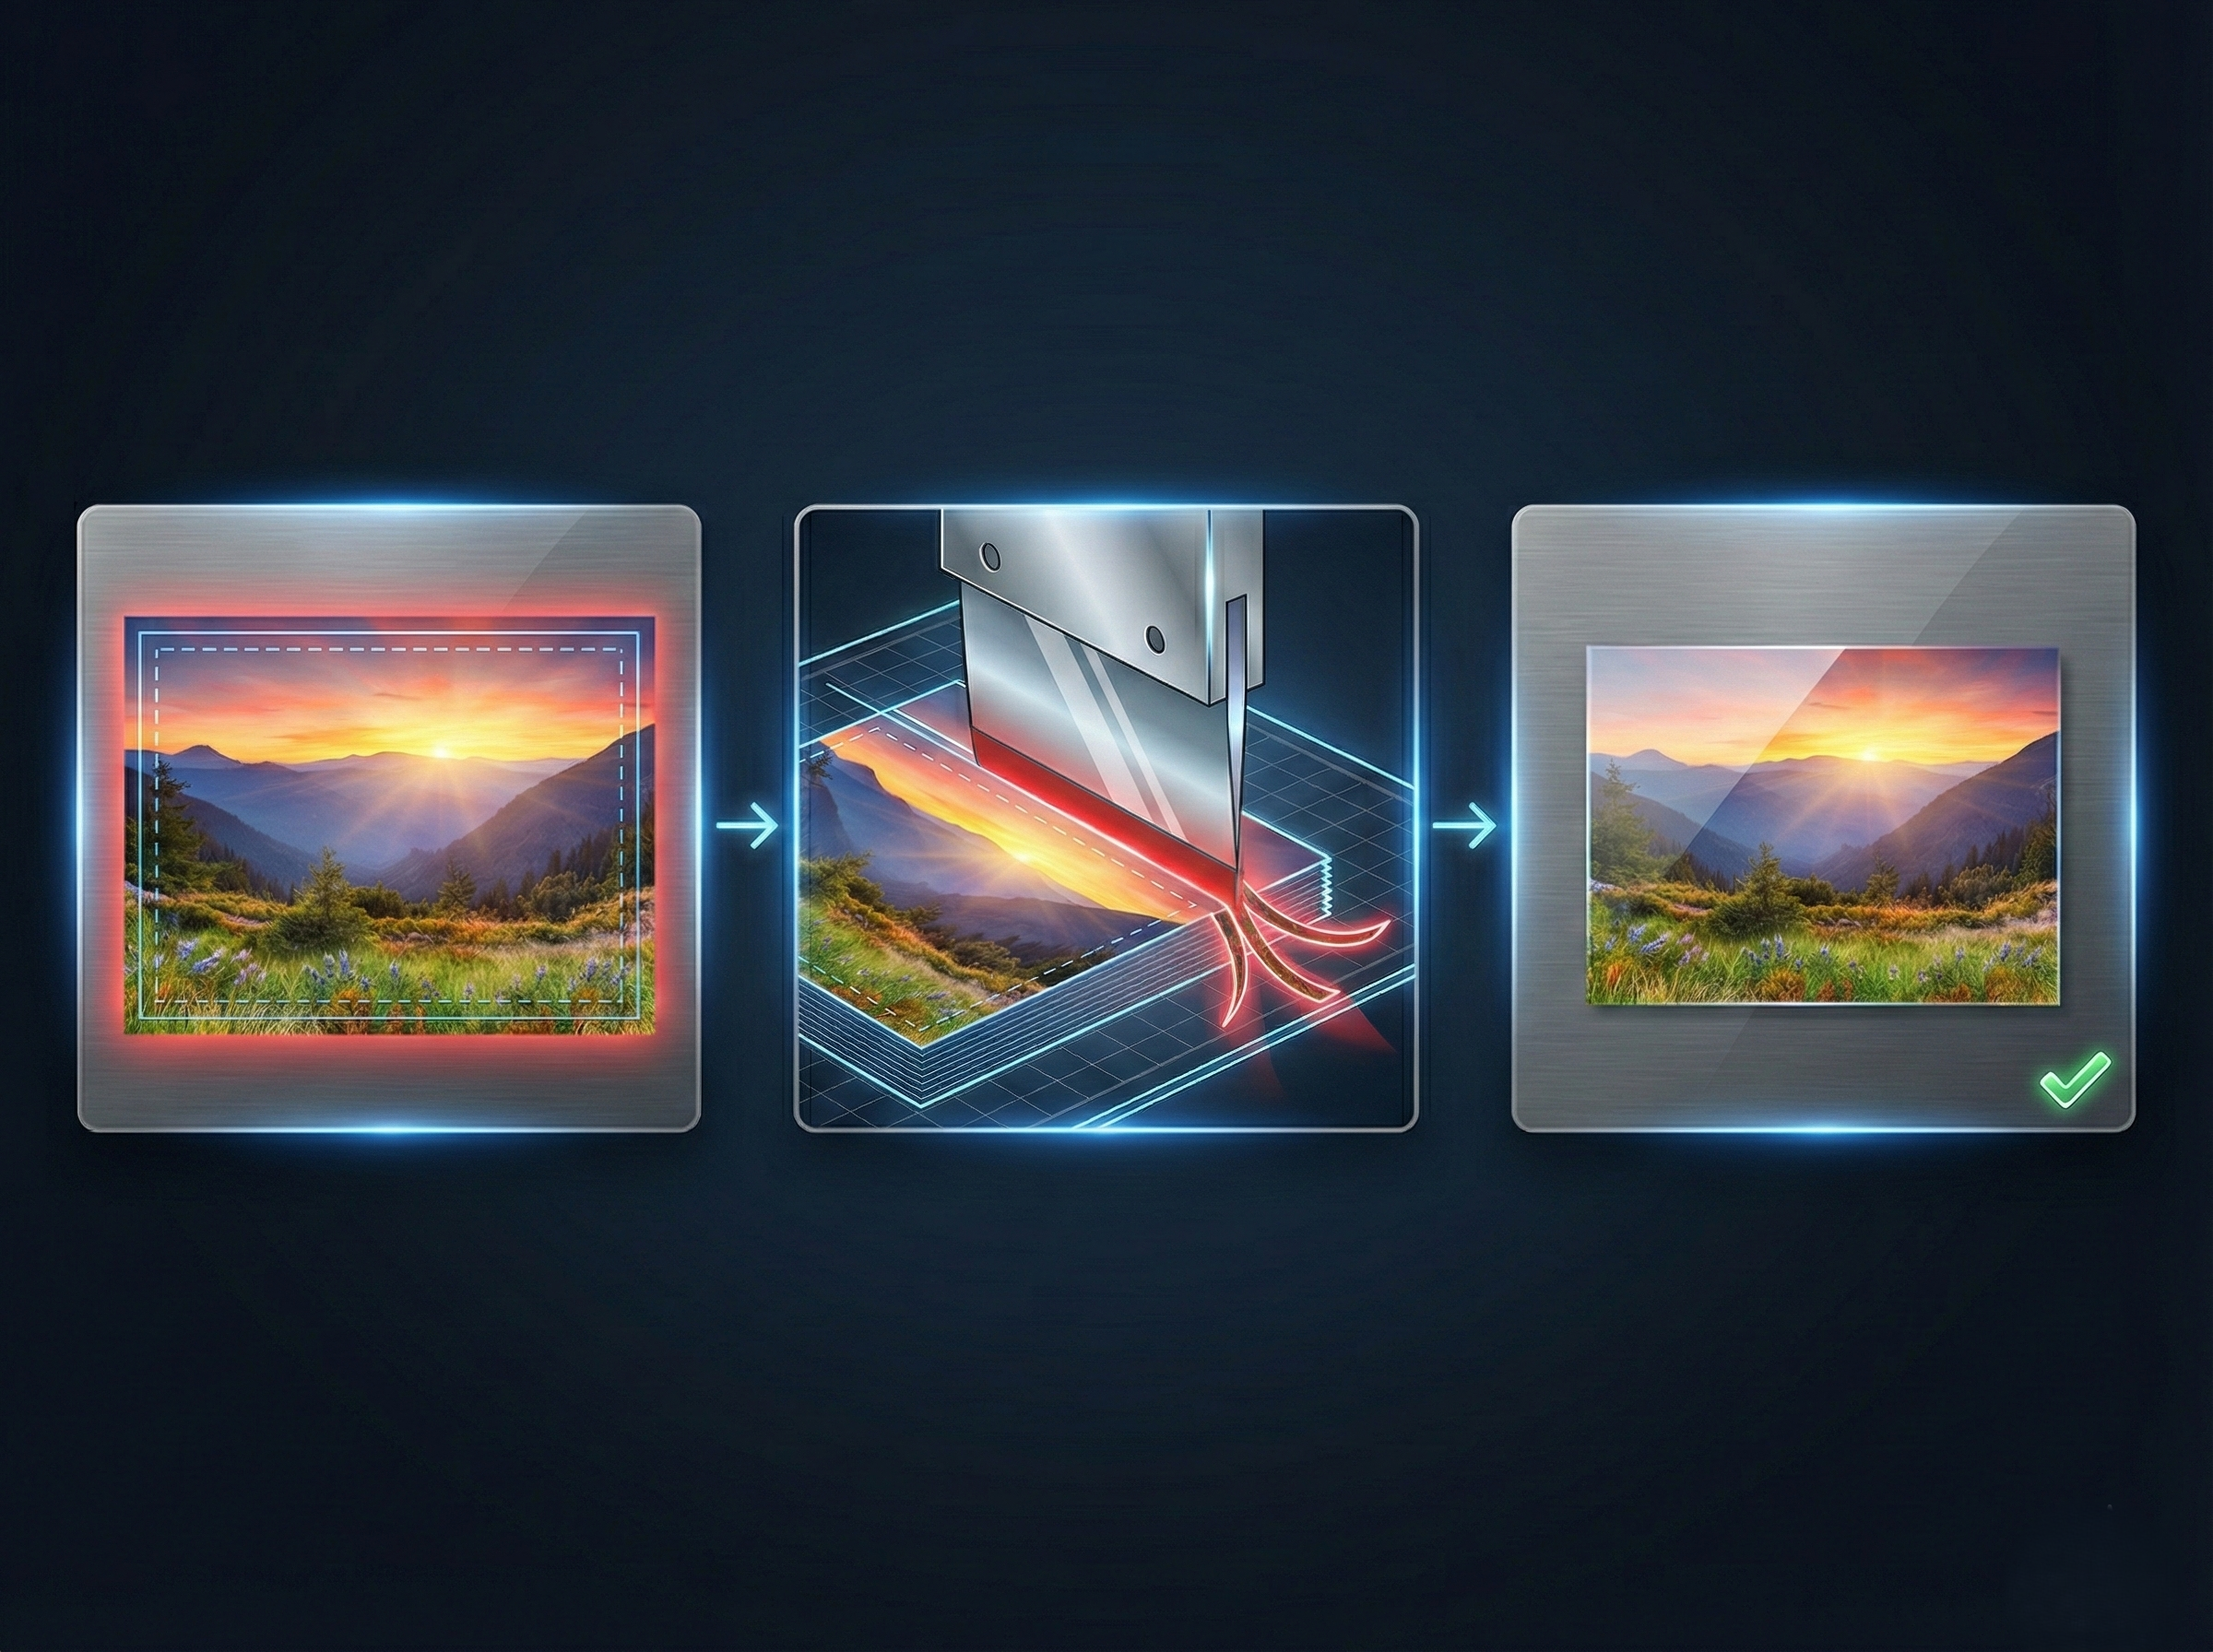
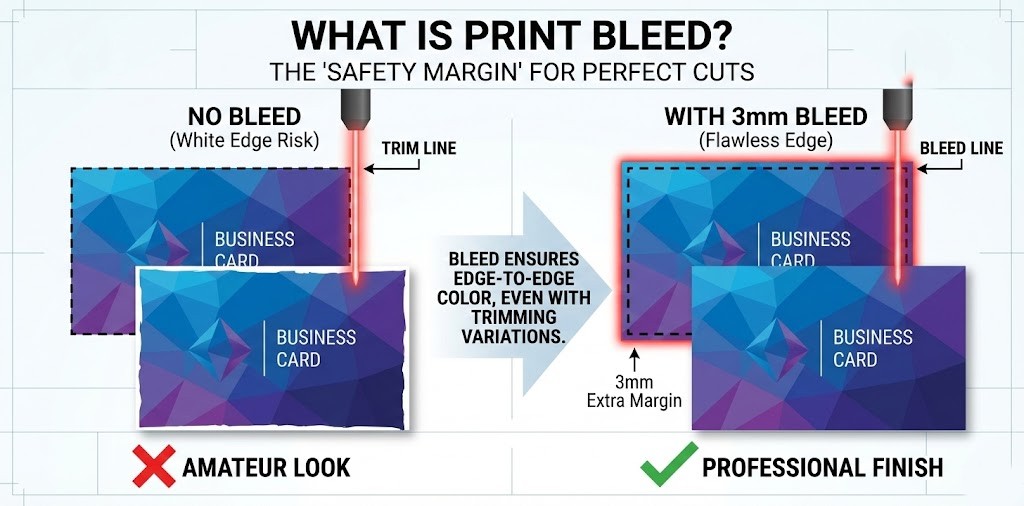
Print bleed is the extra area of your design that extends beyond the final trim size of your printed piece. Think of it as a safety margin that ensures your design prints edge-to-edge without any white borders or cut-off elements. why 300 DPI matters for printing
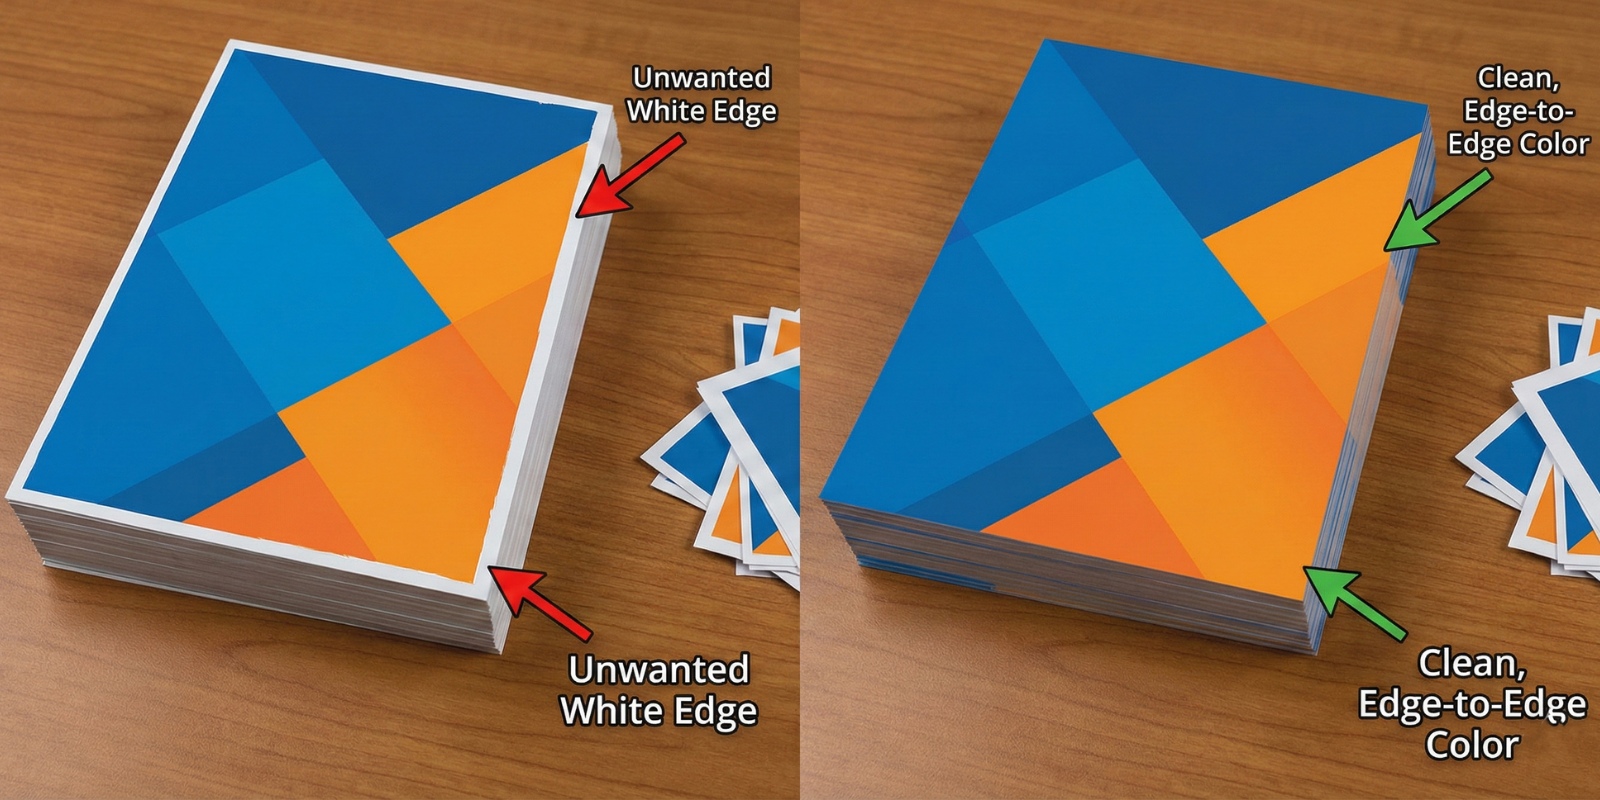
Here’s how it works: When commercial printers in Ontario cut your finished prints to size, the cutting process (called trimming) isn’t always perfectly precise down to the millimetre. There can be slight variations of 1-2mm in either direction. Without bleed, these tiny variations would result in unwanted white edges or, worse, important content getting trimmed off.
The standard bleed measurement in professional printing is 3mm (0.125 inches) on all sides. This means if you’re designing a business card that will be 89mm x 51mm when finished, your design file should actually be 95mm x 57mm to accommodate the 3mm bleed on each edge.
Why Print Bleed Matters for Your Business
Understanding bleed isn’t just a technical detail—it directly impacts the professional appearance of your marketing materials and your bottom line.
The Cost of Getting it Wrong
Based on our experience at Niagara Print Express, approximately 30% of first-time clients submit files without proper bleed setup. This leads to several problems:
- Reprinting costs: Fixing a bleed error after printing can cost 50-100% of your original order
- Timeline delays: Reprints typically add 3-5 business days to your project
- Professional appearance: White borders or cut-off elements make your materials look amateurish
- Wasted budget: Money spent on unusable prints is money that could have gone to other marketing efforts
For a typical 1,000-unit business card order in the Niagara Region, a bleed mistake could cost an additional $150-$300 and delay your launch event or trade show appearance.
When Bleed is Essential
You need to add bleed to your design files whenever:
- Your design includes background colours or images that extend to the edge
- You’re printing photographs or graphics that are meant to be full-bleed
- Your design uses borders or frames near the edges
- Any design element should touch the edge of the final printed piece
How to Set Up Bleed Correctly in Your Design Files
Setting up bleed properly from the start saves time, money, and frustration. Here’s how to do it in the most common design software. business card printing Niagara

- When creating a new document, click "More Settings"
- Under "Bleed," enter 3mm (or 0.125 inches) for all four sides
- Design your file so background elements extend to the bleed line (red outline)
- Keep important text and logos within the safe zone (inside the trim line)
- Create your document at the final trim size first
- Go to Image > Canvas Size
- Add 6mm to both width and height (3mm on each side)
- Select "Relative" and check "Anchor: Center"
- Extend your background to fill the new canvas size

- Under File > Document Setup
- Enter 3mm in all four bleed fields
- InDesign will automatically show bleed guides (red lines)
- Extend background elements to the bleed guides
- When exporting to PDF, check "Use Document Bleed Settings"
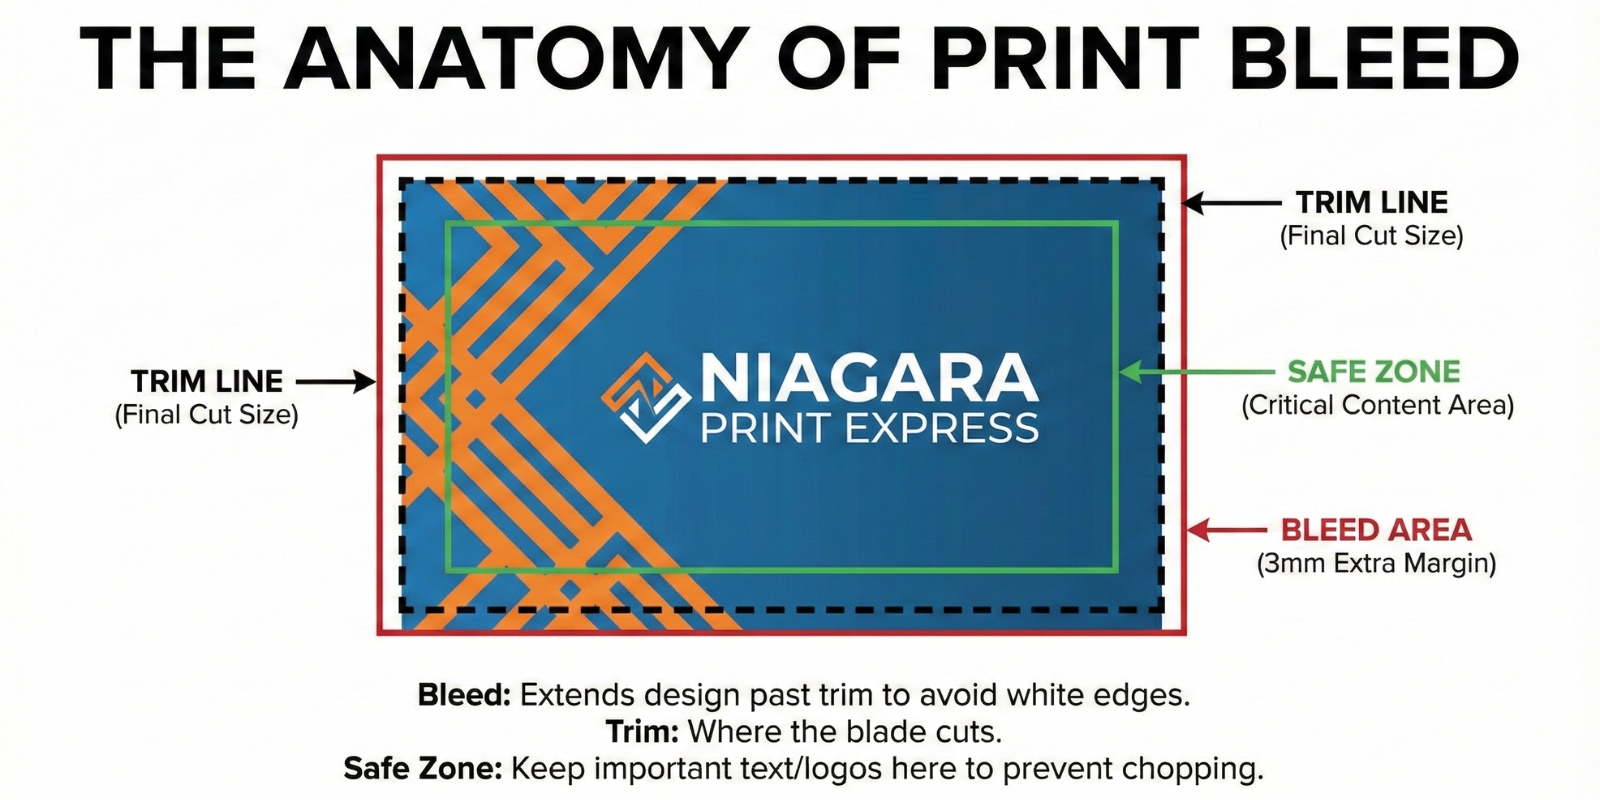
The Safe Zone: Protecting Your Important Content
While bleed extends outward, you also need to consider the safe zone—the area where all critical content should stay. The safe zone is typically 3-5mm inside the trim line.
Keep these elements inside the safe zone:
- Text (headlines, body copy, contact information)
- Logos and branding elements
- QR codes or barcodes
- Important images or faces
- Call-to-action buttons
A common mistake we see at our Pelham location is clients who extend their backgrounds correctly but place text too close to the trim edge. Even if the text doesn’t get cut off, having it too close to the edge looks cramped and unprofessional. custom sticker printing Pelham & Niagara
Common Bleed Mistakes and How to Avoid Them
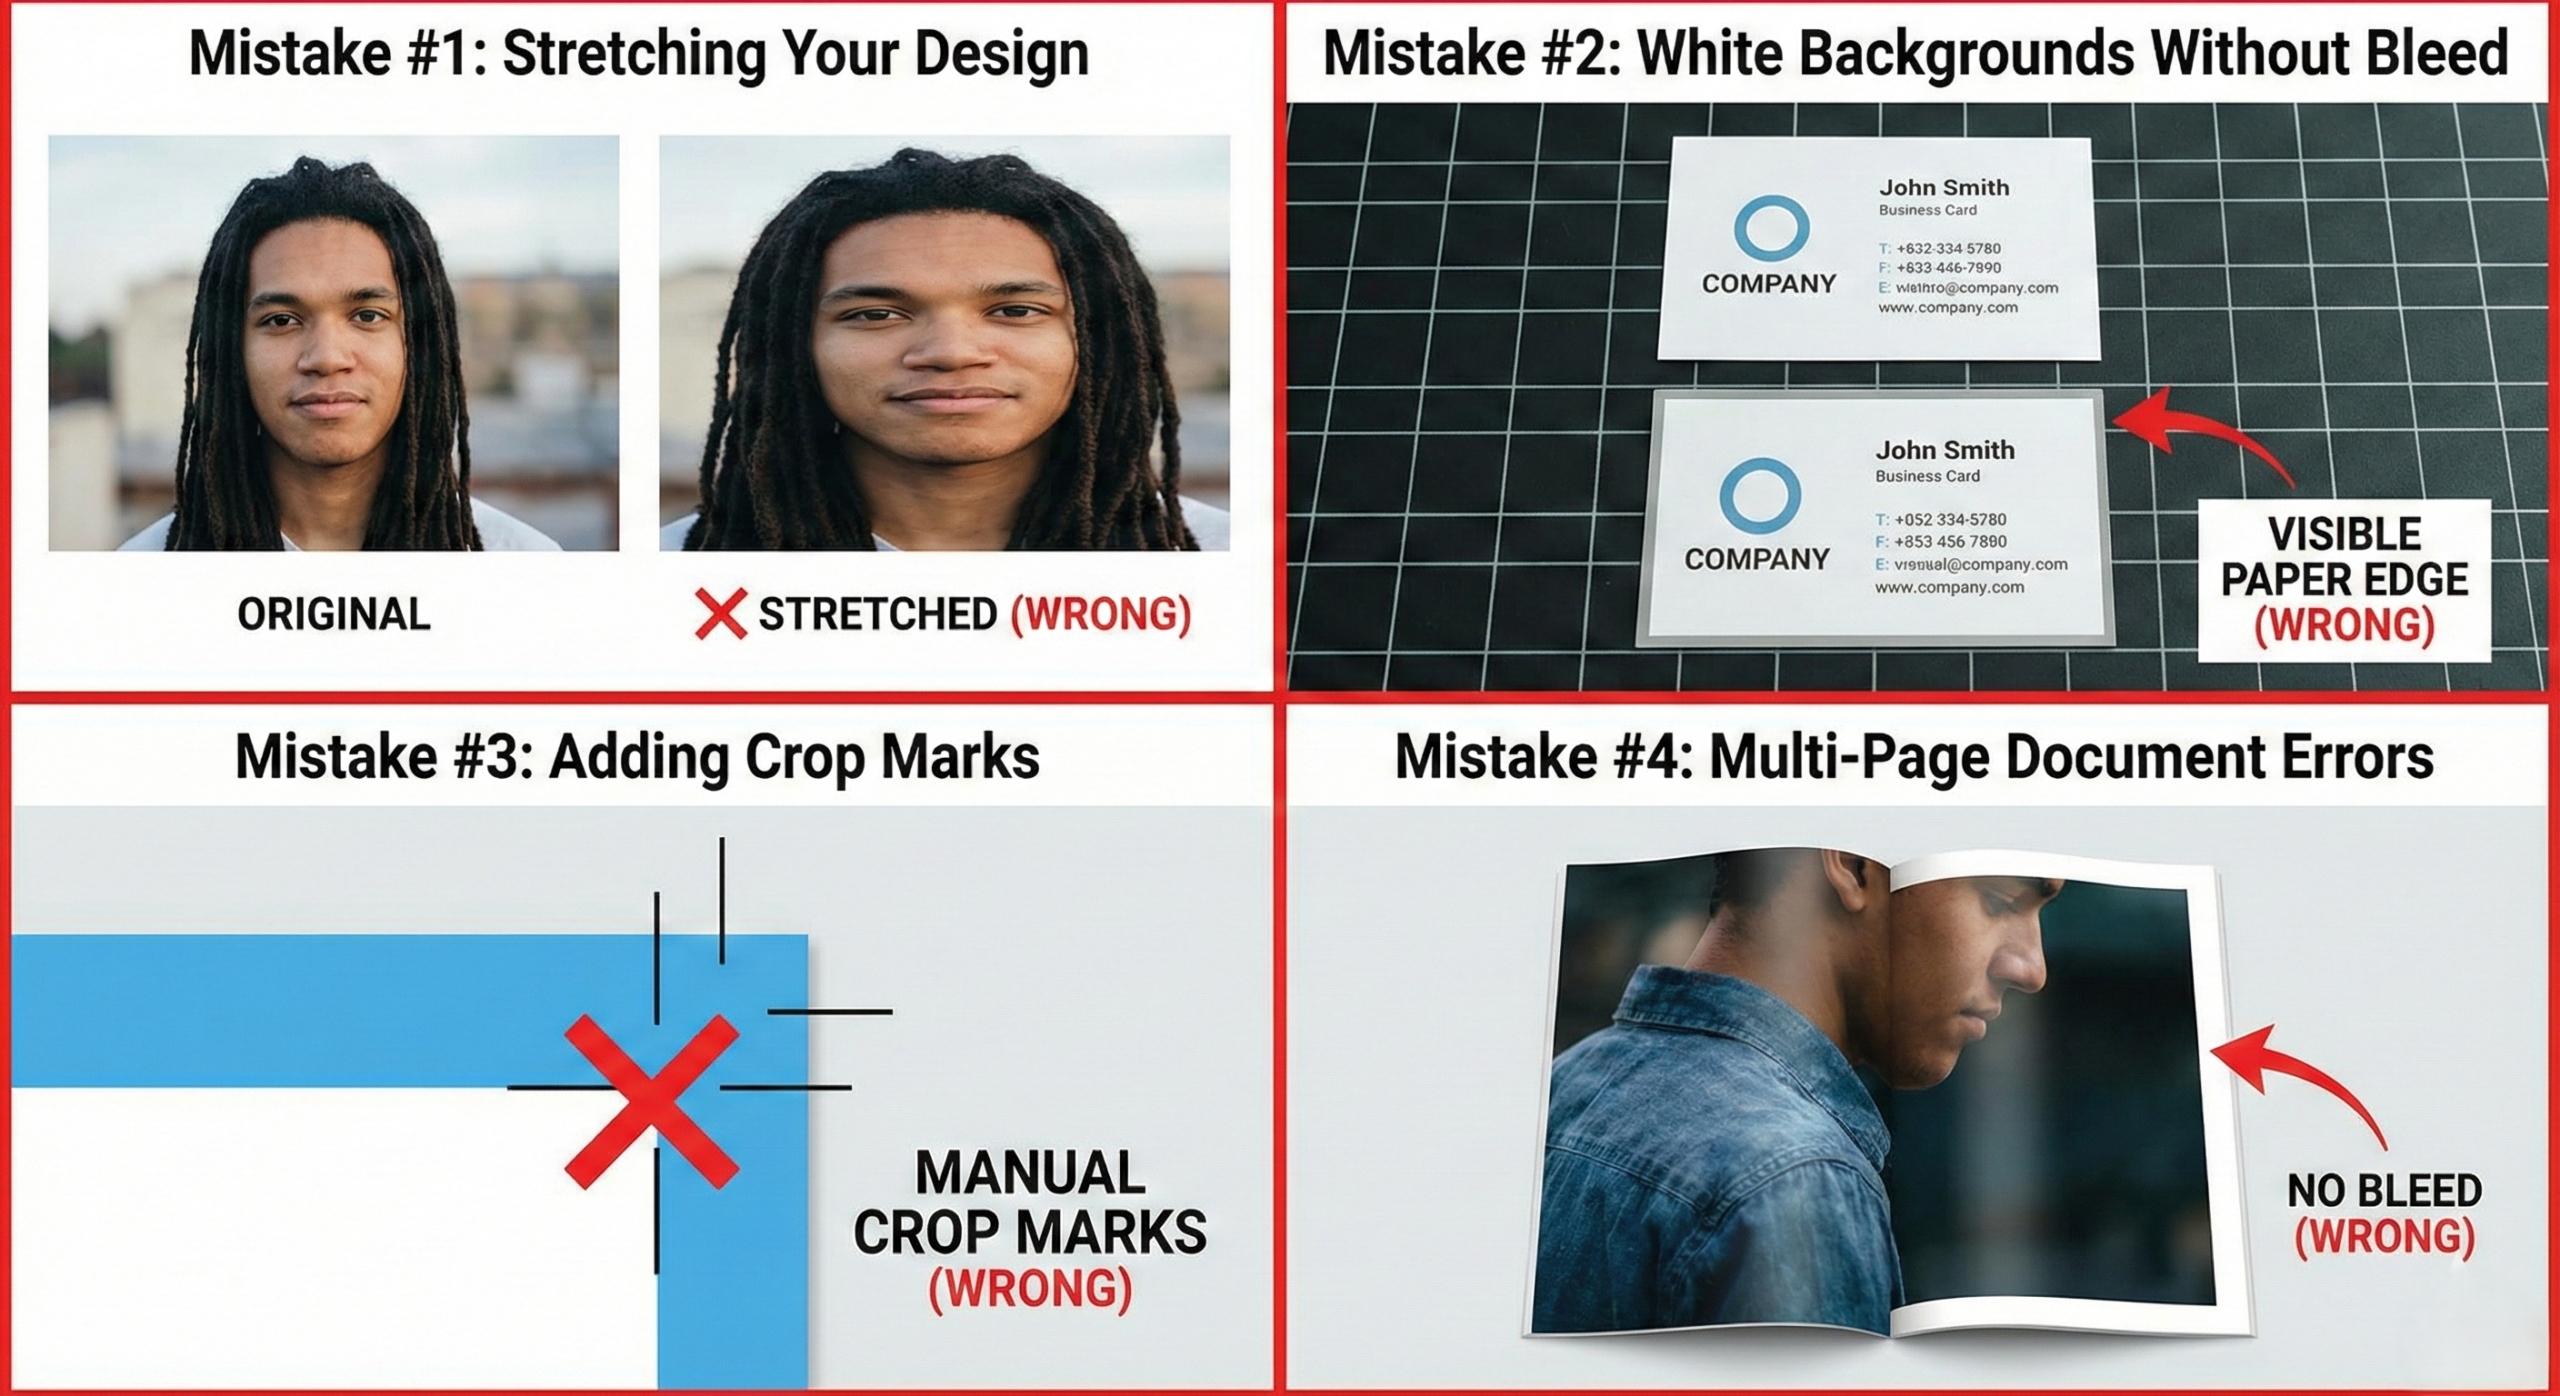
- Mistake #1: Stretching Your Design to Add Bleed
Never simply stretch or scale up your finished design to add bleed. This distorts your carefully crafted layout and images. Instead, extend your background elements naturally beyond the trim line.
- The Right Way: If you have a blue background, extend that blue colour an extra 3mm on all sides. If you have a photo background, use content-aware fill or clone stamp tools to extend it naturally.
- Mistake #2: Using White Backgrounds Without Bleed
“My background is white, so I don’t need bleed, right?” Wrong. Even white backgrounds need bleed. If you don’t include it, slight trimming variations will expose the paper colour underneath, which might not be pure white.
- Mistake #3: Adding Crop Marks Inside the Bleed Area
Professional printers like Niagara Print Express add crop marks automatically. Don’t add your own crop marks or registration marks—they interfere with our automated cutting systems and often end up visible on the final product.
- Mistake #4: Forgetting Bleed on Multi-Page Documents
Brochures, booklets, and catalogues need bleed on every single page, not just the cover. Each page that has elements extending to the edge requires proper bleed setup.
File Export Best Practices for Commercial Printing
Once your design is complete with proper bleed, you need to export it correctly.
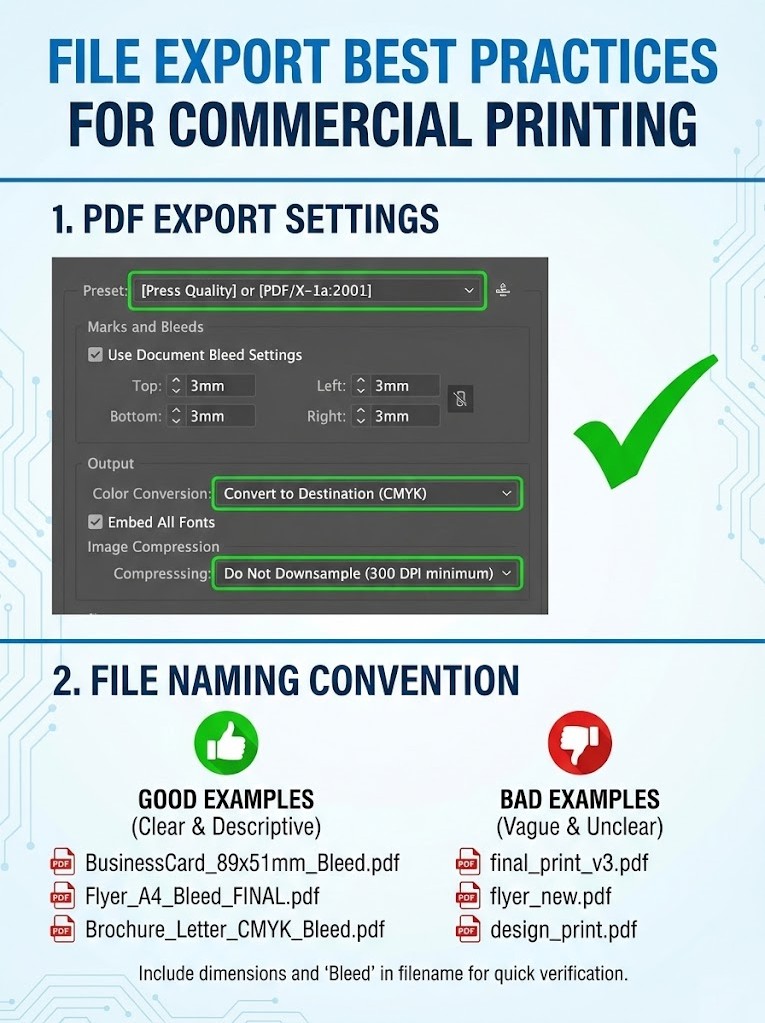
PDF Export Settings
When saving as PDF for professional printing services in Ontario:
- Choose “Press Quality” or “PDF/X-1a:2001” preset
- Include bleed in the export settings (3mm all sides)
- Embed all fonts
- Convert colours to CMYK (not RGB)
- Set resolution to 300 DPI minimum
- Do not downsample images
File Naming Convention
Use clear, descriptive file names that include dimensions:
BusinessCard_89x51mm_Bleed.pdfFlyer_A4_Bleed_FINAL.pdf
This helps your printing partner quickly verify the correct specifications.
Real-World Example: The $800 Trade Show Mistake
Last year, a Niagara-based winery contacted us two days before a major Toronto trade show. They had ordered 500 promotional postcards from another printer, but when they arrived, a thin white line appeared on one edge of every card because the file had no bleed. how to add bleed in Canva for printing
The rush reprint cost them $800 and nearly caused them to miss the event entirely. After switching to Niagara Print Express and learning about proper bleed setup, they’ve never had another issue with their marketing materials.
This scenario happens more often than you’d think, especially with businesses new to professional printing services.

Bleed Checklist: Get it Right Every Time
Before submitting files to any commercial printing service in the Niagara Region, use this checklist:
- ✓ Design file is set up 3mm larger on each side than final trim size
- ✓ Background colours and images extend fully to bleed lines
- ✓ All text is at least 3-5mm inside the trim line
- ✓ Logos and important elements are in the safe zone
- ✓ File is exported as high-resolution PDF (300 DPI)
- ✓ Colours are in CMYK, not RGB
- ✓ All fonts are embedded or outlined
- ✓ Bleed is included in PDF export settings
- ✓ File name clearly indicates dimensions and includes “bleed”
When to Consult with Your Printer
While understanding bleed empowers you to prepare better files, sometimes it’s worth consulting with your professional printing partner before finalizing your design. At Niagara Print Express, we offer pre-press consultations for clients in Pelham and throughout the Niagara Region. how to set up bleed in Adobe InDesign
Contact us before you design if:
- You’re working on a complex multi-page project
- Your design includes special finishes (foil, embossing, die-cutting)
- You’re printing unusual sizes or materials
- You’re unsure about any technical specifications
- You’re working with a tight deadline and can’t afford mistakes
A 10-minute conversation can save hours of revision work and hundreds of dollars in reprints.
Key Takeaways: Master Print Bleed in 5 Points
Understanding and implementing proper print bleed doesn’t have to be complicated. Remember these essential points:
- Add 3mm bleed on all sides of any design with edge-to-edge elements
- Keep important content 3-5mm inside the trim line (safe zone)
- Extend backgrounds naturally—never stretch your entire design
- Export with bleed included in your PDF settings
- When in doubt, ask your printer before finalizing your design
By following these guidelines, you’ll produce professional, print-ready files that look exactly as you envisioned them—without the costly reprints and delays that plague businesses who skip this crucial step. 5 label printing mistakes to avoid
Your Partner in Professional Printing
At Niagara Print Express, we understand that not everyone is a print production expert—and that’s okay. Our team is here to help businesses throughout the Niagara Region produce outstanding marketing materials that make an impact.
Whether you’re designing business cards, brochures, posters, or complex marketing campaigns, we’ll ensure your files are set up correctly from the start. We offer free file reviews and pre-press consultations to catch potential issues before they become expensive problems.
Ready to bring your print project to life without the worry of bleed mistakes? Contact Niagara Print Express at (289) 897-9026 or email niagaraprintexpress@gmail.com for a free quote and file consultation. Let’s make sure your next print project is flawless from design to delivery.
Frequently Asked Questions (FAQs)
What is bleed in printing?
Bleed in printing is the extra area (usually 3mm) added around the edges of a design so that colours or images print all the way to the edge after trimming, without leaving white borders.
How much bleed should I add for printing in Canada?
Most professional printers in Canada, including Niagara Print Express, require 3mm (0.125 inches) of bleed on all sides of your design for accurate trimming.
Do I need bleed if my background is white?
Yes. Even white backgrounds need bleed. Without it, small trimming variations can expose the paper edge, which may appear off-white or uneven.
What happens if I don’t include bleed in my print file?
Missing bleed can result in white edges, cut-off designs, or the need for costly reprints and delays—especially for business cards, flyers, and brochures.
What is the safe zone in printing?
The safe zone is an area 3–5mm inside the trim line where all important content like text, logos, and QR codes should stay to avoid being trimmed off.
Does bleed apply to multi-page documents like brochures?
Yes. Every page in a brochure, booklet, or catalogue that has elements reaching the edge must include bleed—not just the cover.
Should I add crop marks to my print file?
No. Professional printers automatically add crop marks during production. Adding your own can interfere with trimming and cause printing issues.
Add a Comment